
Selfhosted Photo Backup with Immich

What are the motivations behind your home lab? Is it a place for you to tinker with new tech or applications? Is your aim to seize back control of your data from our corporate oppressors? Or, do you simply want to host useful services for yourself, friends and family?
If your answer is any of the above, I'd highly recommend looking into Immich, a selfhosted photo and video backup solution that is completely free and open source. This application is under very active development and thus is constantly receiving feature and stability updates. The only downside of this is that frequent updates are required to ensure your server version aligns with the current mobile app version; however, a stable release is on the horizon which should prevent this being a problem.
Immich boasts all the features that you'd come to expect from a modern photo backup solution such as support for Live photos, geolocation, timelines. It has extremely polished native apps for both iOS and Android, and to top it off, it has advanced machine learning features such as duplicate detection and facial/object recognition.
If you'd like to find out more I'd encourage you to read the official documentation to find out all Immich has to offer and decide for yourself.


Well... I think I've shilled this app hard enough already so let's progress onto the meat of this post. We're going to deploy Immich with Docker, expose it using Cloudflare tunnels, and finally, secure access to it with Cloudflare Access.
Immich Deployment
Linux machine w/ Docker + Docker Compose
Domain hosted in Cloudflare
NVIDIA Container Toolkit - If using HW Acceleration
To kick off this process, we'll need to get Immich installed of course. Immich's own documentation does a fantastic job of guiding you through this but we'll run through the steps here for completeness.
Create a new directory for the docker-compose.yml file and the required .env files and cd into it.
mkdir ./immich-app
cd ./immich-app
Use wget to pull the files you need for your configuration. The docker-compose.yml and the base .env files are mandatory.
Get docker-compose.yml file.
wget -O docker-compose.yml https://github.com/immich-app/immich/releases/latest/download/docker-compose.yml
Get .env file.
wget -O .env https://github.com/immich-app/immich/releases/latest/download/example.env
(Optional) Get hwaccel.transcoding.yml file.
wget -O hwaccel.transcoding.yml https://github.com/immich-app/immich/releases/latest/download/hwaccel.transcoding.yml
Optional) Get hwaccel.ml.yml file.
wget -O hwaccel.ml.yml https://github.com/immich-app/immich/releases/latest/download/hwaccel.ml.yml
You'll notice there are two additional .env files named hwaccel.ml.yml and hwaccel.transcoding.yml. These are used to enable hardware acceleration for both machine learning features and video encoding respectively, provided you have a supported GPU. I haven't personally seen a huge benefit to hardware accelerated video encoding in Immich but I would highly recommend configuring this for the ML hardware acceleration if you're able to.
Now that we have the required files, there are a few tweaks we'll need to make to the .env file. Firstly, we want to pin Immich to a particular version, I'd recommend checking the releases page of Immich on GitHub and setting this to the most recent version. We'll also want to set the location where your uploaded content will be stored, please note this is the location in the docker hosts file system, not within the container. Finally, create a secure DB password and be sure to record this safely in a password vault.
In the docker-compose.yml file itself, there are a few further tweaks we need to make to enable hardware acceleration if applicable, this part consists of uncommenting the extends, file and service keys and setting the service to the appropriate API for your GPU e.g. NVENC for NVIDIA GPUs or QuickSync for Intel.
Now we're ready to deploy, Run the below command to spin up the Immich stack. The images are on the larger side so you may be waiting a few minutes for the deployment to complete.
docker-compose up -d
Browse to port 2283 on your severs IP to set up your admin account and access the Immich web UI. With the above complete you now have a compete deployment of Immich. This is great but currently this app is only accessible on our local network, not ideal if you want to ensure your photos are being backed up no matter your location. This is where Cloudflare will help us out.
There are a couple of aspects to the Cloudflare configuration. The first is setting up an identity provider. This is going to help secure access to our Immich instance with MFA amongst other things, additional measures such as geo-blocking can also be implemented. The second aspect is using Cloudflare Tunnels to expose Immich to the internet via an encrypted connection complete with TLS certificates.
Configure IdP
To secure Immich we'll need to configure an identity provider in the Cloudflare Zero-Trust Dashboard.
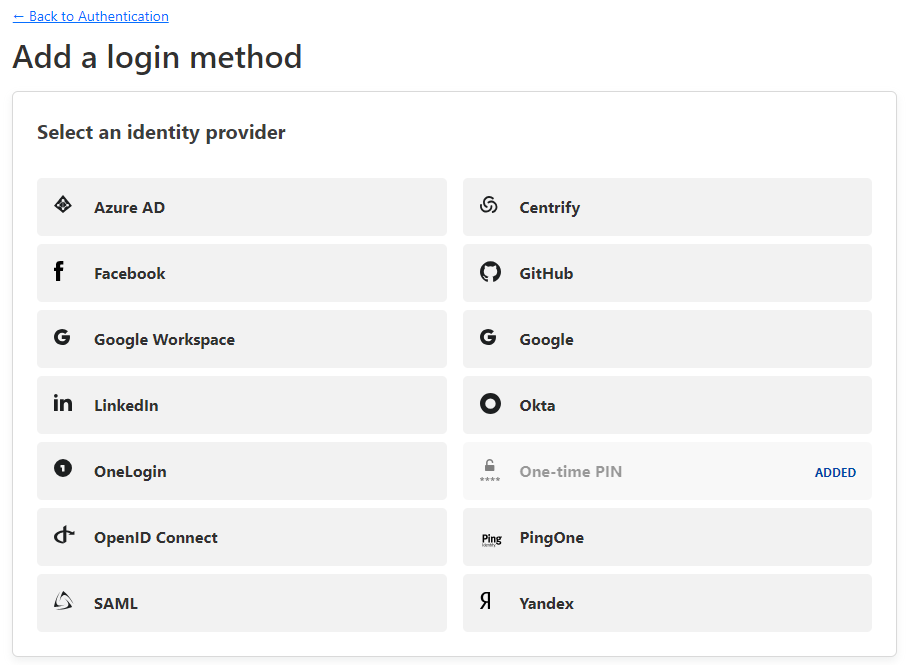
In the Zero-Trust dashboard navigate to Settings -> Authentication -> Login methods -> Add new.
There are a plethora of providers to choose from including Microsoft Entra, Okta, GitHub, Google as well as generic Open ID Connect so you can utilise your own selfhosted identity providers like Authelia. Each IdP comes with detailed instructions on how to configure it.
As the purpose of this article is to serve as a proof of concept, we'll be using the default One-time PIN provider in this instance.
Once your login method of choice has been configured, we can move onto the access policy in which we'll define the authentication method and any access rules you wish to add.
Cloudflare SaaS Application setup
Navigate to Access -> Applications -> Add an application
Select SaaS as the application type, provide a name and select OIDC as the authentication type.
On the Configure application page, configure the below redirect URLs:
- https://immich.yourdomain.com/auth/login
- https://immich.yourdomain.com/user-settings
- https://immich.yourdomain.com/api/oauth/mobile-redirect
- http://yourServerIp:2283/auth/login
- http://yourServerIp:2283/user-settings
Set your App Launcher URL to https://immich.yourdomain.com. If you would like to set a custom app icon, enter the URL for it in the Application logo section. The URL for the official Immich logo is https://immich.app/img/immich-logo-stacked-dark.svg.
In the Identity providers section, One-time PIN should be selected by default if you have not configured any additional identity providers. Select Save configuration to move on to configuring our access policy.
Provide a name for the policy, leave the action set to Allow and set a session duration. for Immich, I'd recommend setting this to a minimum of 24 hours as the mobile app will stop syncing photos to your server each time the session expires requiring you to re-authenticate.
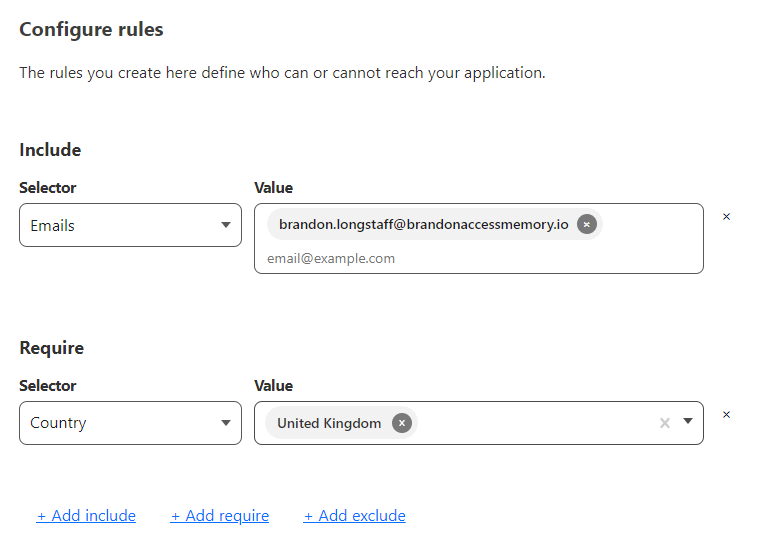
Now onto configuring the rules. As a standard, I like to add a requirement for requests to originate from my country of origin and for additional security you can restrict access to your specific email address. It's worth noting that if you're using SAML or OIDC you can add the requirement for certain claims in the authentication token, for example the user must be a member of X group.
When designing your policies I'd recommend consulting the below documentation as it can be easy to accidentally block yourself from accessing your application.

Once you've configured your policy to your liking proceed to the final page of the policy configuration. This page allows you to configured Cross-Origin Resource Sharing headers, this is not necessary for our use case so we'll select Add Application to complete the policy setup process.
Configure Access via Cloudflare Tunnels
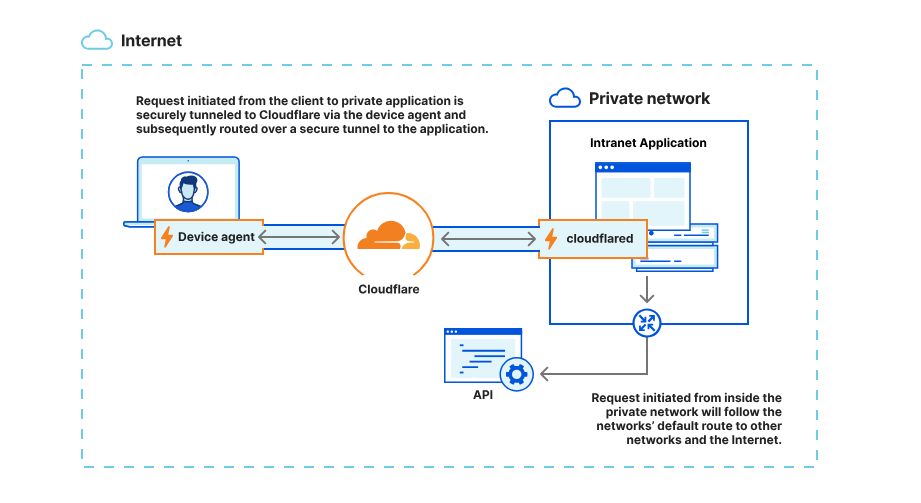
I've touched on Cloudflare Tunnels in a previous article, essentially this technology uses a lightweight daemon to create outbound connections to Cloudflare's infrastructure to provide a secure proxied connection to your application. Any connections made to applications via a Cloudflare Tunnel are encrypted via short lived Lets's Encrypt certificates.
I've linked some further reading below if you'd like to know more.
To setup our Tunnel, select Networks -> Tunnels -> Create a Tunnel.
On the Select tunnel type choose Cloudflared. Provide a name for your Tunnel and select Next.
In this instance we'll be using the Docker connector but there are a variety of installation options for different operating systems.
Run the provided docker run command on your docker host to spin up the container.

Back to Networks -> Tunnels, you'll hopefully find your tunnel has checked in and has the status of Healthy. Select your Tunnel -> Edit.
Switch to the Public hostnames tab. It's here we're going to configure on which hostname and where our app can be reached. Please ensure your using the same hostname you defined in your access policy or it will not be applied.
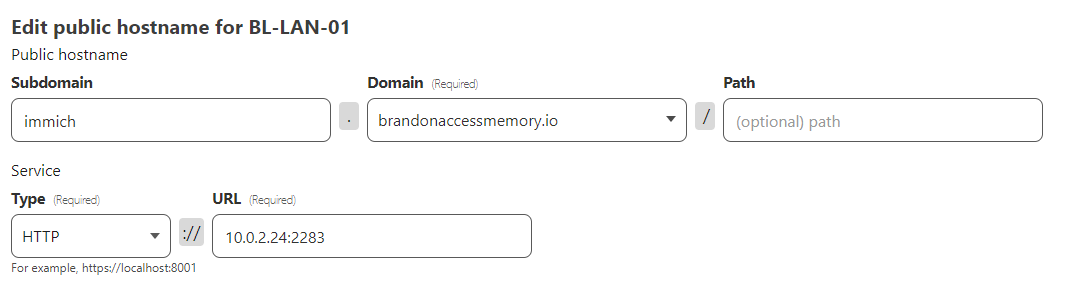
Once you've configured the above , select Save hostname.
Immich OAuth Configuration
To configure OAuth authentication in Immich log into your Immich server and navigate to Administration -> Settings -> Authentication settings -> OAuth.
Enter the Issuer URL, Client ID and Client Secret we recorded earlier and set Scope to openid email profile.
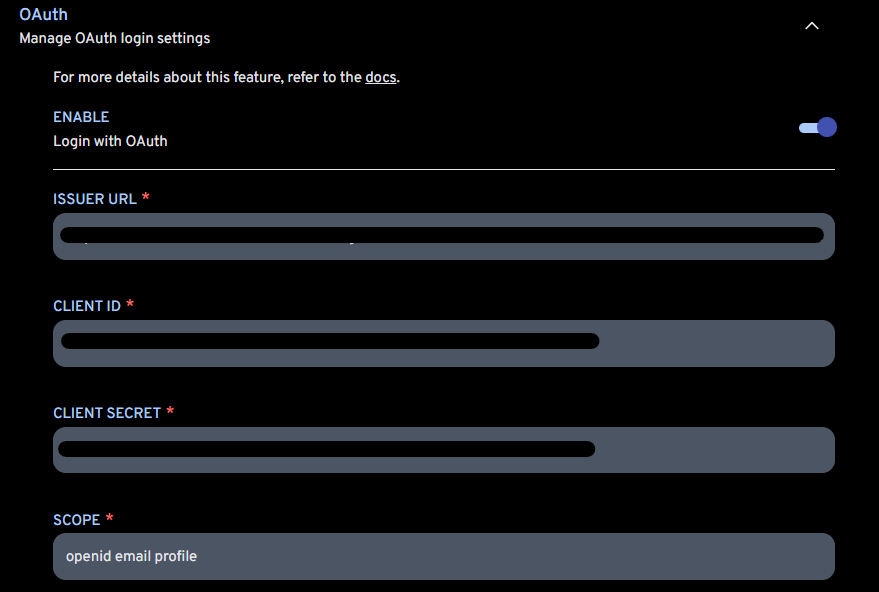
If configuring additional claims, they can be used to automatically set custom labels and assign storage quotas.
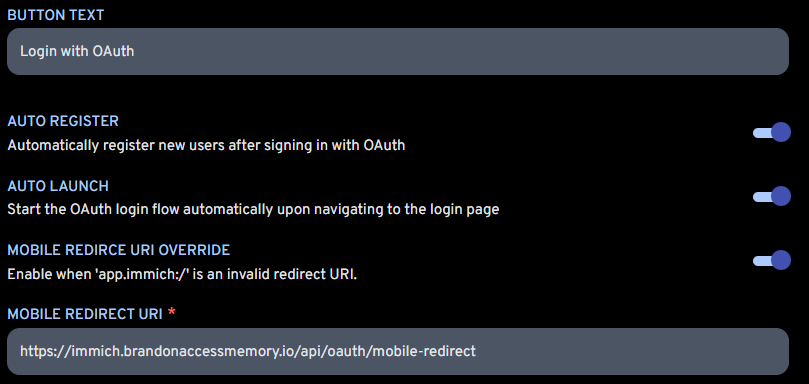
In the final section you can configure the OAuth login button text to your liking, enable Auto register, Auto launch and Mobile redirect URI override and finally add the URL https://immich.yourdomain.com/api/oauth/mobileredirect as the Mobile redirect URI.
Save your configuration and test that OAuth authentication works as you'd expect both in a web browser and in the Immich mobile app. If there are any issues I'd recommend verifying your redirect URLs are configured correctly in your Cloudflare SaaS application.
Once you've verified OAuth authentication works correctly, you can disable standard password authentication for Immich in Authentication settings -> Password login to lockdown access to OAuth only.
Closing notes
Congrats! Your app should now be reachable via the hostname you configured and secured with OAuth utilising Once-time PIN MFA and any other access policies you configured.
My main motivation behind writing this article was that sadly Immich does not have sufficiently robust authentication on its own to safely expose on the internet. Without exposing, Immich is sadly limited to having to use a VPN to connect back to your home network in order to sync photos when you're away from home.
When looking for a better solution, I found helpful bits and pieces but no start to finish setup guides so hopefully this article has been helpful in making your selfhosting journey more secure.
In particular I'd like to shoutout Shanelord01 whose work formed the basis of this article.


This article was based off a fully working configuration I have deployed in my homelab.
Thanks for reading and feel free to leave a comment with any suggestions or improvements.
Member discussion