
Exposing applications using Cloudflare & Traefik

So... you've spun up Vaultwarden or Nextcloud in your lab and now you want to share it with friends/family. Well great, get those ports forwarded on your router and you're good to go...? NOOOO! Under no circumstances should you do that. There are a number of methods in which you can safely (relatively speaking) expose applications to the internet, two of which we'll cover in this article.
Careful consideration should be taken in evaluating the benefits/drawbacks of publicly exposing a selfhosted application. Before proceeding, I'd ask myself the following questions:
- Do the benefits of exposing this application/service outweigh the risks?
- Do I have sufficient understanding of the security implications, and the mitigations that can be put in place, to reduce these as much as possible?
- Does the application have robust authentication mechanisms, or can they be provided by an additional service?
Now, back on topic…
1 - Cloudflare Tunnels
First stop is good ol' Cloudflare tunnels. This technology is one of Cloudflare's Zero-Trust offerings included with a free tier account. This was my primary method of exposing applications as it was quite straight forward to setup and add your applications. It also allows your app to benefit from other Cloudflare features such as their Web Application Firewall (WAF) and/or Cloudflare Access, their Identity proxy. All these aspects helped alleviate some of my security concerns when I was first starting out.

Tunnels work by establishing an outbound reverse tunnel from within your network to Cloudflare's datacentres via a lightweight daemon/connector. The main advantage of this approach is that the connection is established from within your network -> Cloudflare, so no ports need to be opened on your firewall. Secondly, it does not require a routable IP address so can be used to punch through CG-NAT and will not break if your dynamic IP changes.
The downsides, especially if you're privacy focused, are that any data accessed via this solution does in fact traverse Cloudflare's infrastructure and it's possible analytics may be performed on this data... no service is truly free these days after all. It's worth baring in mind this solution was designed to serve HTML based web applications so Cloudflare could take issue if using it to stream video content or otherwise consume large amounts of bandwidth.
Configuration
To configure this solution, you'll need a domain hosted with Cloudflare and access to the Cloudflare dashboard.
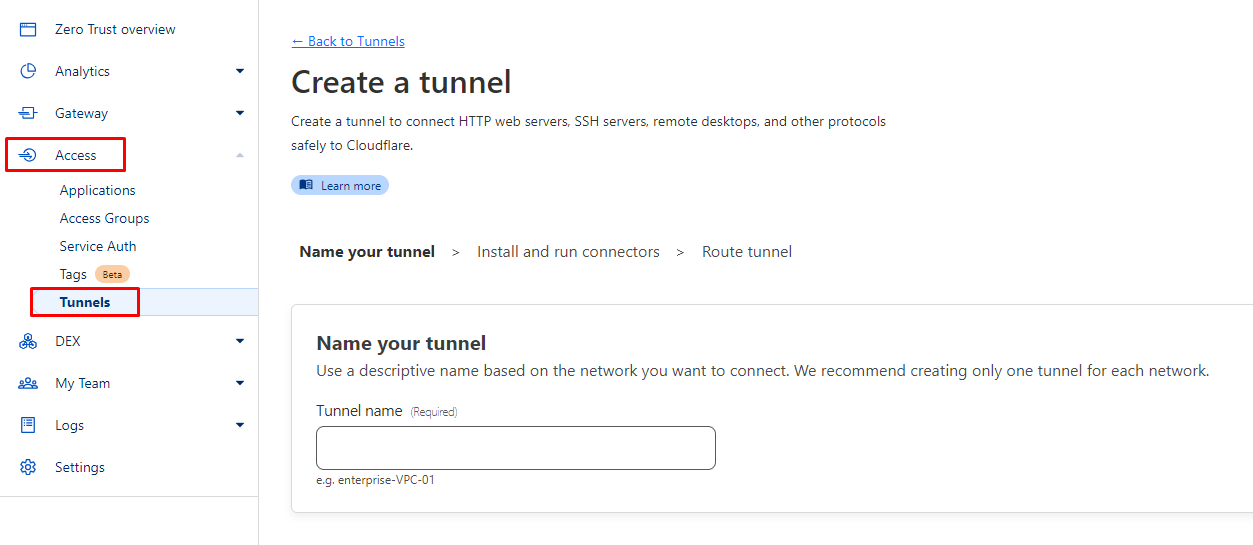
From the dashboard, select Access, this will take you to the separate Zero-Trust dashboard.
Collapse the Access menu and select Tunnels.
Create a new Tunnel and provide a name for it. Bare in mind a single tunnel can service many different applications.
The next step will be to install the connector for which Cloudflare provides some simple to follow instructions. The connector can be installed on most operating systems and architectures or even as a docker container which is my particular preference. It is also possible to install multiple connectors for the same Tunnel to provide redundancy should one of your VMs/hosts go down.
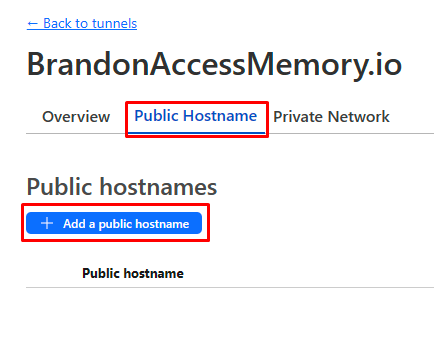
Once you have setup your connector(s), back in the zero trust dashboard, you will see your new tunnel appear in the list. Select it, then configure.

Navigate to the Public hostname tab and select Add a public hostname.
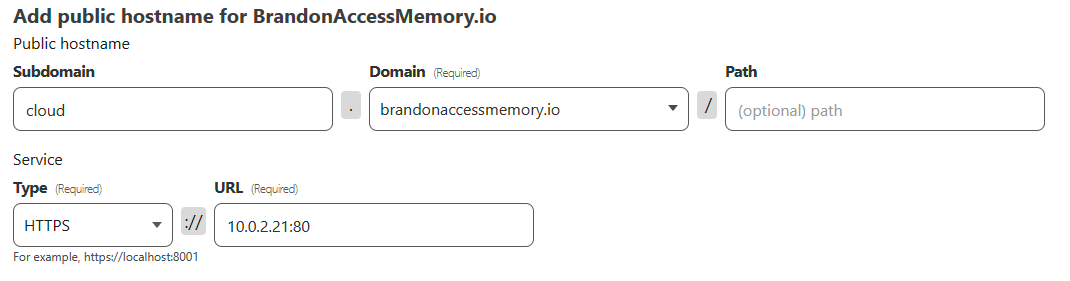
Now we set the public hostname, via which our application will be accessible, then we enter the Internal IP address and port of our application. See my below example in which I setup access to my Nextcloud servers internal IP address on port 80.
At this stage your setup requirements may vary so please consult the official documentation or post a question on the Cloudflare forum, they've been very helpful for me in the past.
If you navigate back to the DNS page on your main Cloudflare dashboard, you’ll find you have a CNAME record corresponding to this new hostname you just configured.
Browse to this hostname to access your application.
2 - Traefik
Next up we have a more advanced option in Traefik. Traefik is a cloud native reverse proxy and comes in the form of a containerised application. In this post we'll be looking at deploying Traefik with Docker Compose.
What we like about Traefik is that it can hook into the docker socket and read attributes on containers allowing for dynamic configuration of new routers and services. Another big plus for Traefik is the acquisition of free wildcard certificates from Let's Encrypt via a DNS challenge. Did I mention these are automatically renewed every 90 days?
Prerequisites
- Linux machine (distro-agnostic) VM or Bare-Metal
- Docker & Docker Compose installed
- SSH/Terminal access
- Domain hosted in Cloudflare or another provider that supports DNS challenges
- Public A Record pointing at your routers IP
❓Don't use Cloudflare?
A list of DNS providers that support DNS challenges are listed in the Let's Encrypt documentation linked below.
Prep
We start this process by creating a docker directory if we don't already have one. This is where we will store our compose files and any container specific configuration files. I like to put this in my home directory. Within your docker directory, run the below commands to create the required files and directories as well as ensure the permissions on acme.json are correct.
mkdir traefik
cd traefik
touch docker.compose.yml
mkdir config
cd config
touch acme.json
chmod 600 acme.json
touch traefik.yml
Once that's all done our directory structure should look like below.
./traefik
├── config
│   ├── acme.json
│   ├── config.yml
│   └── dynamic_config.yml
└── docker-compose.yml
We now need to create a docker network which Traefik and any proxied applications will reside on.
docker network create traefik_network
Configuration
Traefik is a highly configurable application and therefore there is no one size fits all configuration that will work for everyone. The below config files should be sufficient to setup Traefik and allow the acquisition of free wildcard certificates from Let's Encrypt.
Static configuration file
As the name implies, the static config is where we'll define configurations of Traefik which are unlikely to change.
The below static config is commented for clarity but essentially the main aspects we're interested in are configuring are theEntryPoints, ports in which Traefik listens on for connections; certificate resolvers, which are used to retrieve certs from an ACME server; and Providers, which are components which Traefik queries to build it's configuration.
Run the below commands to edit config.yml and add the below configuration.
cd config
nano config.yml
global:
  checkNewVersion: true                       # Periodically check if a new version has been released.
  sendAnonymousUsage: true                    # Periodically send anonymous usage statistics.

# -- (Optional) Change Log Level and Format here...
#     - loglevels [DEBUG, INFO, WARNING, ERROR, CRITICAL]
#     - format [common, json, logfmt]
log:
 level: WARNING
 format: common
 filePath: /var/log/traefik/traefik.log

# -- (Optional) Enable Accesslog and change Format here...
#     - format [common, json, logfmt]
accessLog:
  format: common
  filePath: /var/log/traefik/access.log

api:
  dashboard: true                             # Enable API dashboard
  insecure: true

entryPoints:
  http:
    address: ":80"                            # Create the HTTP entrypoint on port 80
  https:
    address: ":443"                           # Create the HTTPS entrypoint on port 443

# Certificate Resolvers are responsible for retrieving certificates from an ACME server
# See https://doc.traefik.io/traefik/https/acme/#certificate-resolvers
certificatesResolvers:
  staging:
    acme:
      email: [email protected]
      storage: /etc/traefik/acme.json
      caServer: "https://acme-staging-v02.api.letsencrypt.org/directory"
      dnsChallenge:
        provider: cloudflare
        resolvers:
          - "1.1.1.1:53"
          - "8.8.8.8:53"

  production:
    acme:
      email: [email protected]
      storage: /etc/traefik/acme.json
      caServer: "https://acme-v02.api.letsencrypt.org/directory"
      dnsChallenge:
        provider: cloudflare
        resolvers:
          - "1.1.1.1:53"
          - "8.8.8.8:53"

providers:
  docker:
    exposedByDefault: false                   # Only expose container that are explicitly enabled (using label traefik.enabled)
    network: "traefik_network"                # Default network to use for connections to all containers.

  file:
    filename: "/etc/traefik/dynamic_config.yaml"       # Link to the dynamic configuration
    watch: true                                        # Watch for modifications
  providersThrottleDuration: "10"                      # Configuration reload frequency
Dynamic configuration file
The dynamic configuration, as the name suggests, is used to configure aspects of Traefik which we may want to change on the fly. The frequency in which the dynamic config file is checked for changes is defined in the static config file via the providersThrottleDuration value.
Here we define a few different Middleware. These are a means of tweaking connection requests before they are sent to our services. In the below configuration I have configured Middleware for redirection, adding security headers, and applying some basic authentication. Additional Middleware can also be defined - consult the documentation if interested.
We have also defined some TLS options which are used to configure the parameters of TLS connections. This is for the purpose of preventing connections on less secure TLS versions (1.0 and 1.1) and enforcing the use of stronger cipher suites. The below config specifies 3 different TLS configurations which can be applied to services via labels.
To edit our dynamic_config.yml
nano dynamic_config.yml
http:
  middlewares:
    # Redirect requests to the http EntryPoint to https
    # Use with the label "traefik.http.routers.traefik.middlewares=https-redirect@file"
    https-redirect:
      redirectScheme:
        scheme: https
        permanent: true

    # Add basic auth generate hashed password using apache2utils
    # Use with the label "traefik.http.routers.traefik.middlewares=traefik-auth@file"
    traefik-auth:
      basicAuth:
        users:
          - "admin:password"

    # Defines default security headers
    default-security-headers:
      headers:
        frameDeny: true
        browserXssFilter: true
        contentTypeNosniff: true
        forceSTSHeader: true
        stsIncludeSubdomains: true
        stsPreload: true
        stsSeconds: 15552000
        customFrameOptionsValue: SAMEORIGIN
        customRequestHeaders:
          X-Forwarded-Proto: https

    # Applies the below middleware to Routers by default
    default:
      chain:
        middlewares:
          - https-redirect
          - default-security-headers

# See https://doc.traefik.io/traefik/https/tls/
tls:
  options:
    # To use with the label "traefik.http.routers.myrouter.tls.options=modern@file"
    modern:
      minVersion: VersionTLS13                          # Minimum TLS Version
      sniStrict: true                                     # Strict SNI Checking

# To use with the label "traefik.http.routers.myrouter.tls.options=intermediate@file"
    intermediate:
      cipherSuites:
        - "TLS_ECDHE_ECDSA_WITH_AES_128_GCM_SHA256"
        - "TLS_ECDHE_RSA_WITH_AES_128_GCM_SHA256"
        - "TLS_ECDHE_ECDSA_WITH_AES_256_GCM_SHA384"
        - "TLS_ECDHE_RSA_WITH_AES_256_GCM_SHA384"
        - "TLS_ECDHE_ECDSA_WITH_CHACHA20_POLY1305"
        - "TLS_ECDHE_RSA_WITH_CHACHA20_POLY1305"
      minVersion: VersionTLS12                            # Minimum TLS Version
      sniStrict: true                                     # Strict SNI Checking

    # To use with the label "traefik.http.routers.myrouter.tls.options=old@file"
    old:
      cipherSuites:
        - "TLS_ECDHE_ECDSA_WITH_AES_128_GCM_SHA256"
        - "TLS_ECDHE_RSA_WITH_AES_128_GCM_SHA256"
        - "TLS_ECDHE_ECDSA_WITH_AES_256_GCM_SHA384"
        - "TLS_ECDHE_RSA_WITH_AES_256_GCM_SHA384"
        - "TLS_ECDHE_ECDSA_WITH_CHACHA20_POLY1305"
        - "TLS_ECDHE_RSA_WITH_CHACHA20_POLY1305"
        - "TLS_ECDHE_ECDSA_WITH_AES_128_CBC_SHA256"
        - "TLS_ECDHE_RSA_WITH_AES_128_CBC_SHA256"
        - "TLS_ECDHE_ECDSA_WITH_AES_128_CBC_SHA"
        - "TLS_ECDHE_RSA_WITH_AES_128_CBC_SHA"
        - "TLS_ECDHE_ECDSA_WITH_AES_256_CBC_SHA"
        - "TLS_ECDHE_RSA_WITH_AES_256_CBC_SHA"
        - "TLS_RSA_WITH_AES_128_GCM_SHA256"
        - "TLS_RSA_WITH_AES_256_GCM_SHA384"
        - "TLS_RSA_WITH_AES_128_CBC_SHA256"
        - "TLS_RSA_WITH_AES_128_CBC_SHA"
        - "TLS_RSA_WITH_AES_256_CBC_SHA"
        - "TLS_RSA_WITH_3DES_EDE_CBC_SHA"
      minVersion: "TLSv1"                                 # Minimum TLS Version
      sniStrict: true                                     # Strict SNI Checking

#   stores:
#     default:
#       defaultCertificate:                               # Overwrite Default Certificates
#         certFile: /etc/traefik/certs/cert.pem
#         keyFile: /etc/traefik/certs/cert-key.pem

serversTransport:
  insecureSkipVerify: true                                # Disable TLS Cert verification check
Docker Compose
That brings us to the final aspect of the configuration, writing the Docker compose file.
As previously mentioned, the Docker API itself is a configuration Provider Traefik can read from and this allows Traefik to be configured using labels we assign to containers on creation. It's using these labels we can specify how routing should be behave, TLS settings, Middleware, etc.
The below compose file creates 2 containers; Traefik itself, and the whoami service. This small container is a lightweight GO server which we'll use to ensure our configuration is correct and our Middleware are behaving as expected by giving us information on hostname, headers, ports, etc.
You may also notice that we're using a .local subdomain to access our whoami service. The reason for this is that we only want to access this tool internally and not expose it to the outside world, so we'll instead put whoami on a .local subdomain which has been defined on our internal DNS servers. This way we can use a .local domain to put certificates Infront of internal services and our publicly available root domain for external services.
Navigate back to the main Traefik directory and edit the docker-compose.yml file.
cd..
nano docker-compose.yml
version: '3'

networks:
  traefik_network:
    external: true

services:
  traefik:
    image: traefik:latest
    container_name: traefik
    restart: unless-stopped
    ports:
      - 80:80
      - 443:443
    volumes:
     - ./config:/etc/traefik
     - ./logs:/var/log/traefik
     - /var/run/docker.sock:/var/run/docker.sock:ro
    environment:
      - TZ=Europe/London
      - CF_DNS_API_TOKEN=YOUR_CLOUDFLARE_API_TOKEN
    labels:
      - "traefik.enable=true"
      - "traefik.http.routers.traefik.entrypoints=http"
      - "traefik.http.routers.traefik.rule=Host(`traefik.local.mydomain.tld`)"
      - "traefik.http.routers.traefik.middlewares=https-redirect@file"
      - "traefik.http.routers.traefik-secure.entrypoints=https"
      - "traefik.http.routers.traefik-secure.rule=Host(`traefik.local.mydomain.tld`)"
      - "traefik.http.routers.traefik-secure.tls=true"
      - "traefik.http.routers.traefik-secure.tls.certresolver=production"
      - "traefik.http.routers.traefik-secure.tls.domains[0].main=local.mydomain.tld"
      - "traefik.http.routers.traefik-secure.tls.domains[0].sans=*.local.mydomain.tld"
      - "traefik.http.routers.traefik-secure.service=api@internal"
    networks:
      - traefik_network

  whoami:
    image: traefik/whoami
    container_name: whoami
    networks:
      - traefik_network
    labels:
      - "traefik.enable=true"
      - "traefik.http.routers.whoami-insecure.rule=Host(`whoami.local.mydomain.tld`)"
      - "traefik.http.routers.whoami-insecure.entrypoints=http"
      - "traefik.http.routers.whoami-insecure.middlewares=https-redirect@file"
      - "traefik.http.routers.whoami.rule=Host(`whoami.local.mydomain.tld`)"
      - "traefik.http.routers.whoami.entrypoints=https"
      - "traefik.http.routers.whoami.tls=true"
      - "traefik.http.routers.whoami.tls.certresolver=production"
      - "traefik.http.routers.whoami.tls.options=intermediate@file"
With our docker-compose file ready, we can spin up the Traefik and whoami services with a single command.
docker-compose up -d
Provided we encountered no errors while bringing up our services, we can navigate to the hostname of our whoami instance in a web browser and should see something akin to the below.
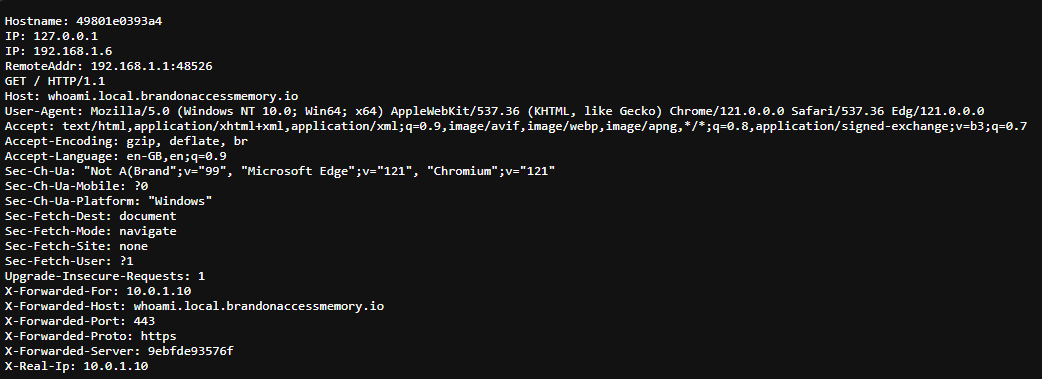
If the https-redirect Middleware is working correctly, the value for X-Forwarded-Port should be 443, this should be the case even if we intentionally try and connect via http.
We can also go to our Traefik dashboard via the hostname traefik.local.example.tld. From here we can see our configured Routers. You'll notice we have two Routers for the whoami service, this is intentional. The "Insecure" router is purely for the purpose of being able to accept http connections and redirect them to https. This can be useful if you are hosting a blog for instance and are looking to improve your search rankings as Google will penalise your site if it is unable to redirect http connections.


There is much more to say about Traefik and it's possibilities. Honestly, it took me several attempts to get Traefik working in my homelab. There is a lot to learn conceptually to understand this powerful and versatile application, but if you put the time into learning it, it will serve you well.
If you've gotten to this point then thank you for reading and I'll always welcome comments - whether it be I've missed an important point, or simply you enjoyed the content.
All the mentioned configuration can be found in my Blog repo on my GitHub.
Member discussion